
Finally home (and with me, many bags waiting to be unpacked).
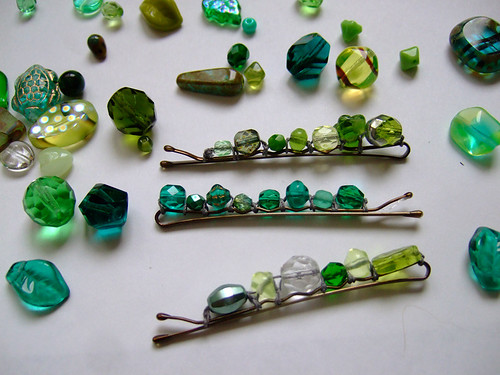
The hair pins above are quick and easy and an excellent way to make a special gift. I've seen beaded pins made with wire, but while traveling found that thread works equally well if not better. To make your own, here's how:
The hair pins above are quick and easy and an excellent way to make a special gift. I've seen beaded pins made with wire, but while traveling found that thread works equally well if not better. To make your own, here's how:
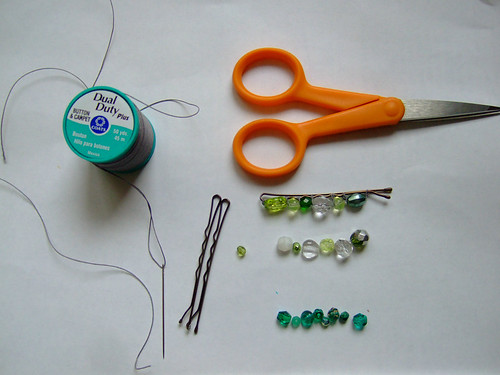
Supplies:
- bobby pins
- beads
- needle and strong thread
- scissors


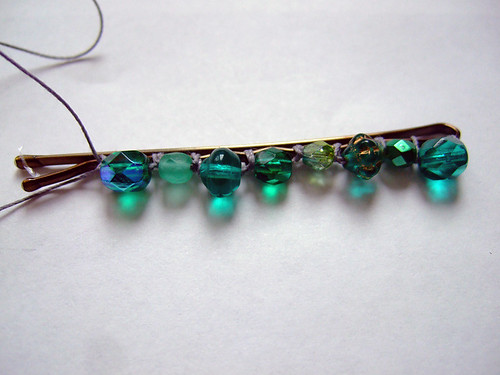
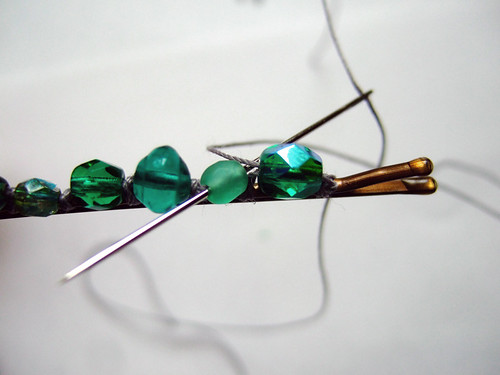
Continue going through the beads one by one.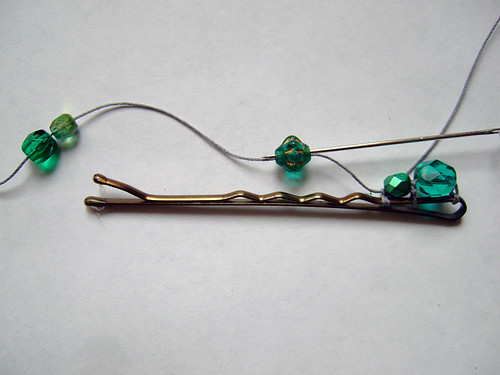
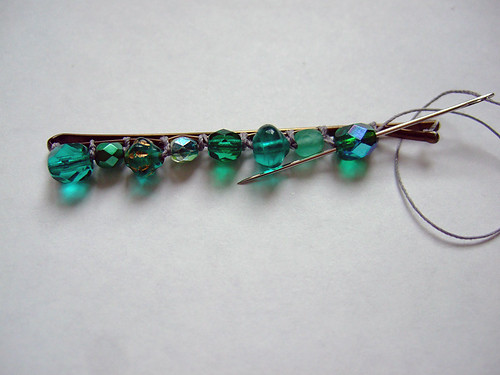
Thread the needle back through the first and/or second bead, through the knot and cut it.
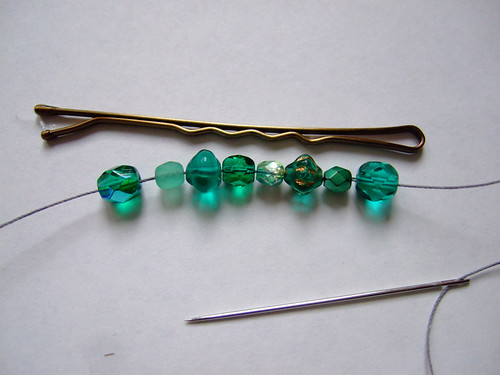
String your beads, roughly the same lengths as the pin.
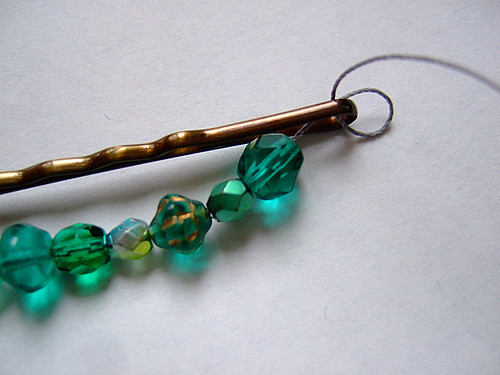
Pull the needle through the eye of the pin and tie.
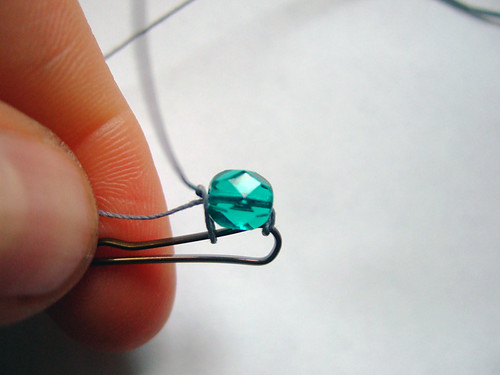
Separate the first bead on the thread (leaving the others) and tie it securely.
Thread the needle back through the bead and tie in front. The following picture illustrates this very well.
Continue going through the beads one by one.
Once all beads are attached to the pin, it's time to finish and "hide" the two ends of thread.
Thread the needle back through the first and/or second bead, through the knot and cut it.
Done. Placed on a small piece of cardboard they make wonderful gifts for little and not so little girls.
Enjoy your week!
Enjoy your week!
So pretty. Thanks for the tutorial.
ReplyDeleteEstupendo paso a paso, quedan bellísimas.
ReplyDeleteBss.
WOW lovely tutorial this looks pretty easy to follow
ReplyDeleteCute! I have a TON of bobby pins lying around from updos for weddings the past few years, and now I know what to do with them! Thanks!
ReplyDeleteHallo Anne,
ReplyDeleteich freu mich sehr deinen Blog gefunden zu haben mit so vielen Inspierationenn.
herzliche gruesse Conny
I really love your ideas!! Thank you!
ReplyDeleteClaudine
Very cute. Thanks for another wonderful tutorial!
ReplyDeleteSophie
Hello! I'm a new follower of your blog. :)
ReplyDeleteThese are so pretty and I can't wait to try to make some! Thanks for the great tutorial!
So lovely! I love this idea. Will make will make! Thank you for sharing it!
ReplyDeleteWhat a cute idea, I'm going to show this to my daughter, I know she'll want to make some.
ReplyDeletebeautiful!! I am going to have to try this. It looks sooo easy and turns out cute.
ReplyDeleteI love how easy to follow these directions are!
ReplyDeleteWow! I love this tutorial! Thanks a lot :)
ReplyDeleteSuch an "of course!" moment: I have always found that my hair gets caught by the wire & not really loved the ones I've made. Since I usually turn to thread to attach everything else, I'm surprised I didn't think....
ReplyDeletesimple brilliance, as always.
So pretty - & what a lovely clear tutorial. Thanks.
ReplyDeleteGreat idea! My daughter will definitely love that. Her hair is kind of difficult to work with, so I am always looking out for new ideas for hair decorations to keep her motivated when we braid. Thanks!
ReplyDeleteMy friend Kelly would love this! She has such pretty dark hair now and this would look lovely peeking from braids or chignon. Or let's face it, hanging down. However, I'm so impossible--I'm having a hard time understanding the steps 3 and 4. Help?
ReplyDelete@boatx: Thanks for bringing this to my attention. There's one image, I probably should have added. Let's see: First, tie the bead to the bobby pin. Then take the needle back through the bead and tie the second knot after the bead. Each time a bead is pushed forward (remember, they are all strung) the needle goes though the next bead in line and tied.
ReplyDeleteHope this helps.
By the way, loved your post on the Osborne shoes. I'd never heard about them before. Thanks.
Love these- my friend Laura has really long and pretty brown hair, and these would look really nice on her. If I could find good beads like that. Where did you get yours?
ReplyDeleteK.K.
My beads were bought in a small shop in Berlin, Germany, but Etsy also sells pretty glass beads. http://www.fusionbeads.com is another source.
ReplyDeleteHope this helps.
Wanted you to know I posted a link to this tutorial today on my blog.
ReplyDeleteNancy Ward
paperFriendly
http://www.nancywardcrafts.com
I love this simple easy & cute creation..awesome camera work my dear :)
ReplyDeleteGreat way to rip off someone else´s designs...
ReplyDeleteFirst off, making them this way, they are not going to last... Secondly, those beads are not swarovski beads...
simply elegant! perfect little accessory to add to any outfit - thanks for sharing :)
ReplyDeletehttp://binksandbubble.blogspot.com
What a fonderful idea !
ReplyDeleteThanks so much for sharing :)
Lucia
Call me Mimì
i've done this with wire before and it pulls your hair out when you try to take them out. thread is so genius! thank you :)
ReplyDeleteNossa! Tão simples e tão lindos! Adorei! bjs: Carol Carneiro
ReplyDelete